Develop custom policy for Anypoint Flex Gateway (MuleSoft)
Flex Gateway is a new addition to the Anypoint platform, to enable customers manage any API anywhere. Anyone who has faced a challenge of managing APIs at scale in the enterprise would agree that one critical aspect is security and governance for APIs. The Anypoint platform offers many features to protect APIs in the form of standard policies to support NON-Functional requirements (NFR). It is important for customers to build their own custom policies to fit unique requirements. Exactly this topic will be explored in this article, how to build custom policy for flex gateway.
Develop custom policy for Flex Gateway
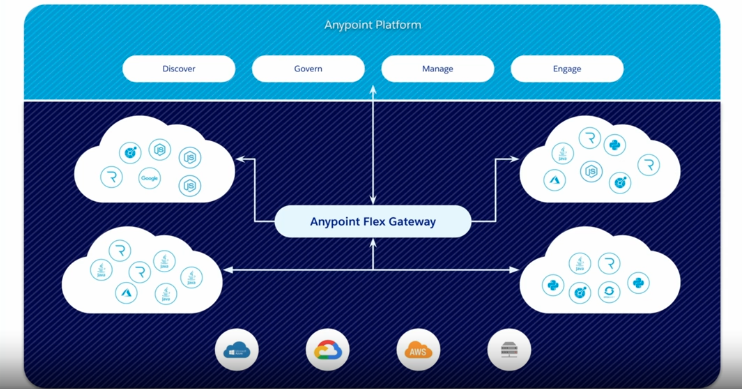
Anypoint Flex Gateway was released in spring of 2022 to allow MuleSoft customers to manage any API deployed anywhere. This product is based on Envoy proxy, that plus other factors enables the Flex Gateway to be very light weight and very fast API Gateway.
Anyone who has faced a challenge of managing APIs at scale in the enterprise would agree that one critical aspect is security and governance for APIs. The Anypoint platform offers many features to protect APIs in the form of standard policies to support NON-Functional requirements (NFR). It is important for customers to build their own custom policies to fit unique requirements. Exactly this topic will be explored in this article, how to build custom policy for flex gateway.
How-to build a custom policy for Anypoint Flex Gateway
In the following sections we will explore how to define and implement custom policy for Flex Gateway. And how to deploy this policy to Flex Gateway in Local or Connected modes to manage your APIs. (More details on these modes and Universal API Management can be found in this webinar: Discover, manage and govern APIs with Universal API management).
Flex can be installed in two modes, local and connected. Connected mode allows users to manage any API using Anypoint Web UI. Local mode enables users to manage any API via a set of configuration files & automations with CICD. For this article we will assume that you have installed and running one of the variants of Flex Gateway, and some sample API configured in Flex, to test the new custom policy.
Custom policies for Anypoint Flex Gateway are implemented using WebAssembly (WASM) for Proxies Rust SDK that runs as a custom filter on Envoy proxy. To build custom policy users need to be familiar with Rust programming. To get started will need to install several tools
Rust SDK Cargo - package manager Flex Gateway in Local mode Custom Policy - to be created Sample API to manage - sample APIs can be found at JSONPlaceholder Sample Identity Service - verify the secret value or token
Implementation of custom policy using Rust SDK
To demonstrate the process of building a custom policy we will use an example of Custom Authentication policy

Custom authentication policy
This article will demonstrate how to create a sample policy definition and implementation for our custom authentication policy. The example policy will block requests where x-custom-auth HTTP header does not match a user-configured value. And make additional HTTP requests to the Identity server to validate this header value. During the policy development process, we will complete the following steps:
- Set up the Rust ABA project.
- Develop the custom policy.
- Compile the custom policy
- Optimize binary size for deployment
- Create the policy definition JSON file.
- Configure and apply new policy to API
- Publish custom policy to Exchange (for connected mode only)
- Deploy custom policy to Flex Gateway (local or connected mode)
Set up the policy implementation Rust project
The first step is to create a Rust project. For this we use cargo command. Cargo is Rust package manager that helps to manage dependencies, compile and build distributions of our custom packages. The following cargo command will create a new Rust project for WASM library extension that will be our custom policy code.
cargo new flex_custom_auth_policy --lib
This will result in new project directory flex_custom_auth_policy
that includes project file Cargo.toml and src/lib.rs source file.
We need to update the Cargo.toml file from its initial state to include our custom policy library source and dependencies. Starting file has only this content:
[package]
name = "flex_custom_auth_policy"
version = "0.1.0"
edition = "2021"

# See more keys and their definitions at https://doc.rust-lang.org/cargo/reference/manifest.html

[dependencies]
The custom policy project need to add [lib] and several dependencies, final file should look like this
[package]
name = "flex_custom_auth_policy"
version = "0.1.0"
edition = "2021"

# See more keys and their definitions at https://doc.rust-lang.org/cargo/reference/manifest.html

[lib]
crate-type = ["cdylib"]
name="flex_custom_auth_policy"
path="src/lib.rs"

[dependencies]
proxy-wasm = { git = "https://github.com/proxy-wasm/proxy-wasm-rust-sdk.git", tag = "v0.2.0" }
serde = { version = "1.0", features = ["derive"] }
serde_json = "1.0"
Develop custom policy
The generated library source file contains this code
We need to Bootstrap generated source file with code required to deploy WASM filter to Envoy. The main block sets the root context, which is an Envoy entity used to generate the child context for each incoming HTTP request.
use proxy_wasm::traits::*;
use proxy_wasm::types::*;
use serde::Deserialize;

proxy_wasm::main! {{
    proxy_wasm::set_log_level(LogLevel::Trace);
    proxy_wasm::set_root_context(|_| -> Box<dyn RootContext> {
        Box::new(CustomAuthRootContext {
            config: CustomAuthConfig::default(),
        })
    });
}}
The resulting library source file should like this code bellow
pub fn add(left: usize, right: usize) -> usize {
    left + right
}

#[cfg(test)]
mod tests {
    use super::*;

    #[test]
    fn it_works() {
        let result = add(2, 2);
        assert_eq!(result, 4);
    }
}

use proxy_wasm::traits::*;
use proxy_wasm::types::*;
use serde::Deserialize;

proxy_wasm::main! {{
    proxy_wasm::set_log_level(LogLevel::Trace);
    proxy_wasm::set_root_context(|_| -> Box<dyn RootContext> {
        Box::new(CustomAuthRootContext {
            config: CustomAuthConfig::default(),
        })
    });
}}


struct CustomAuthRootContext {
    config: CustomAuthConfig,
}

impl Context for CustomAuthRootContext {}

impl RootContext for CustomAuthRootContext {

    fn on_configure(&mut self, _: usize) -> bool {
        if let Some(config_bytes) = self.get_plugin_configuration() {
            self.config = serde_json::from_slice(config_bytes.as_slice()).unwrap();
        }

        true
    }

    fn create_http_context(&self, _: u32) -> Option<Box<dyn HttpContext>> {
        Some(Box::new(CustomAuthHttpContext {
            config: self.config.clone(),
        }))
    }

    fn get_type(&self) -> Option<ContextType> {
        Some(ContextType::HttpContext)
    }
}

#[derive(Default, Clone, Deserialize)]
struct CustomAuthConfig {

    #[serde(alias = "secret-value")]
    secret_value: String,
}

struct CustomAuthHttpContext {
    pub config: CustomAuthConfig,
}

impl Context for CustomAuthHttpContext {}

impl HttpContext for CustomAuthHttpContext {
    fn on_http_request_headers(&mut self, _num_headers: usize, _end_of_stream: bool) -> Action {

        if let Some(value) = self.get_http_request_header("x-custom-auth") {
            if self.config.secret_value == value {
                return Action::Continue;
            }
        }
        self.send_http_response(401, Vec::new(), None);
        Action::Pause
    }
}
Important: Our custom policy requires a custom HTTP auth header that we name as x-custom-auth. We only reference this name inside RUST code and not anywhere else, because we also define an alias for this header as #[serde(alias = “secret-value”)] Inside all configuration files we use alias secret-value while referring to this custom header.
Compile custom policy
Enable compilation by adding wasm32 as a target using following command:
rustup target add wasm32-unknown-unknown
Compile your custom policy via the following command:
cargo build --target wasm32-unknown-unknown --release
Compilation outputs a binary .wasm file into the ./target/wasm32-unknown-unknown/release directory.
Optimize binary custom policy
The size of the binary file can be large, even with few dependencies. Optimize file size using wasm-gc, a CLI that removes unneeded exports, imports, and functions. The optimized binary can be up to 90% lighter.
To enable optimization, install wasm-gc via the following command:
cargo install wasm-gc
Perform the optimization by executing wasm-gc command against your binary policy file. Note that name must match the project and generated file name, in this case we are using flex_custom_auth_policy.wasm:
wasm-gc target/wasm32-unknown-unknown/release/flex_custom_auth_policy.wasm -o target/flex_custom_auth_policy-final.wasm
The optimized binary is created in the ./target directory. At this point we have a choice to use the policy in local mode or publish this binary policy implementation to Exchange and deploy it in connected mode.
Deploy custom policy for Flex Gateway in Local mode
In the prior section we compiled and built an optimized version of the policy implementation binary. Now we can deploy this binary to the existing flex gateway. And apply to an API managed by flex gateway. To do this we need to base-64 encode our policy binary and copy its content as string into the Flex Gateway configuration file.
In local mode flex uses configuration files to manage APIs. There are two modes: Inline - all 3 configurations are stored in the same file separated by — delimiter Resource-Based mode (configuration stored in 3 separate files).
For single API we typically use the following three configuration files
- API Definition yaml file
- API Service (implementation) yaml file
- API Binding yaml file
To configure our new policy for an existing API we will add 3 additional configurations
- Custom Auth policy definition yaml config
- Custom Policy implementation yaml with embedded binary
- Policy binding configuration to apply new policy to API
For this purpose we use an Inline mode where these policy configurations are stored in a single config file. In real production environment it is beneficial to store API binding separate files For more information MuleSoft documentation: Deploying Custom Policy for Flex Gateway in Local Mode
New Policy extension definition
Create a yaml configuration with type Extension to identify our new policy and describe any required properties. Our configuration needs to look like this:
apiVersion: gateway.mulesoft.com/v1alpha1
kind: Extension
metadata:
  name: custom-local-example-definition
spec:
  extends:
  - name: extension-authentication
  - name: extension-definition
  properties:
    secret-value:
      type: string
    server-host:
   Type: string
  required:
    - secret-value
Implementation - Encode binary in base-64
Now we need to encode the policy implementation binary in base-64. File located in
target/flex_custom_auth_policy-final.wasm
Use this command to encode the binary
base64 <your-custom-policy-name>.wasm | tr -d '\n\r' > policy
Open the encoded file policy in text editor and copy all text to Flex policy extension implementation config yaml and replace this value: <WASM_BINARY_IN_BASE64>
apiVersion: gateway.mulesoft.com/v1alpha1
kind: Extension
metadata:
  name: custom-local-example-flex
spec:
  extends:
    - name: custom-local-example-definition
    - name: envoy-filter
    - name: proxy-wasm-filter
  properties:
    rootId:
      type: string
      default: main
    implementation:
      type: string
      default: base64://<WASM_BINARY_IN_BASE64>
Policy binding configuration
Add policy binding configuration yaml, (this should be a separate file for production to reuse same policy on many APIs)
apiVersion: gateway.mulesoft.com/v1alpha1
kind: PolicyBinding
metadata:
  name: custom-local-example
spec:
  targetRef:
    kind: ApiInstance
    name: loan-api
  policyRef:
    kind: Extension
    name: custom-local-example-flex
  config:
    secret-value: "loan-example-value"
Deploy to Flex Gateway in local mode
Copy this new configuration file into flex configuration directory. Flex will apply this policy to API and we are done! Now we can test that our API is protected with a new policy.
Deploy Custom Policy to Flex Gateway in Connected mode
To use our custom policy in connected mode we need to publish the policy to Anypoint Exchange. For that require to create three configuration files:
- Policy definition JSON Schema: policy-definition.json
- Policy definition yaml file: policy-definition.yaml
- Policy implementation metadata yaml file: policy-metadata.yaml
Create policy definition/schema JSON file
Custom policy implementations require a policy definition JSON file or another name for it is schema definition, in order to publish our new policy to Exchange and use this policy in connected mode. Flex Gateway passes policy configuration as JSON with that policy definition structure to the Envoy WASM filter.
Note: This JSON definition file is not used in local mode. Therefore we do not need to publish to Exchange to deploy custom policy to Flex Gateway in Local mode.
The example authentication header policy has only one parameter: the value that needs to be passed in the header and validated by the policy. The policy definition JSON file should match the following:
{
  "title": "Custom Auth Header",
  "type": "object",
  "description": "Enforces HTTP authentication matching x-custom-auth value to what is configured in the policy.",
  "properties": {
    "secret-value": {
      "title": "Custom Auth Header Password",
      "type": "string",
      "@context": {
        "@characteristics": [
          "security:sensitive"
        ]
      }
    }
  },
  "required": [
    "secret-value"
  ],
  "unevaluatedProperties": false,
  "@context": {
    "@vocab": "anypoint://vocabulary/policy.yaml#",
    "security": "anypoint://vocabulary/policy.yaml#"
  },
  "$id": "custom-auth-header-simple",
  "$schema": "https://json-schema.org/draft/2019-09/schema"
}
Create a policy definition yaml file
The following is an example of our custom policy definition
#%Policy Definition 0.1
name: Max Custom Auth Policy
description: Enforces HTTP Basic authentication according to the details configured in the policy.
category: Security
providedCharacteristics:
  - Requires authentication
requiredCharacteristics: []
interfaceScope: ["api", "resource"]
interfaceTransformation: []
encryptionSupported: true
violationCategory: authentication
Create a policy metadata yaml file
The following is an example of our custom policy’s metadata yaml file. Important to note that this is a Flex Gateway policy, not a Mule Runtime policy, therefore the version parameter for min/max Runtime version must be related to Flex Gateway product min-max version as 1.0.0 - 2.0.0 respectively.
#%Policy Implementation 1.0
minRuntimeVersion: 1.0.0
maxRuntimeVersion: 2.0.0
technology: flexGateway
name: Max Custom Auth Mule Implementation
releaseNotes: "This policy requires custom Auth HTTP headers added to request as - x-custom-auth with secret value"
Known Issues: If the implementation version of this custom policy set incorrectly as example version 4.0.0 once published it cannot be used in Flex Connected mode. Due to Exchange not recognizing this policy as Flex but defaults to standard Mule 4 runtime policy type. Changing version also does not fix the issue, policy must be deleted and recreated.
Publish custom policy to Exchange
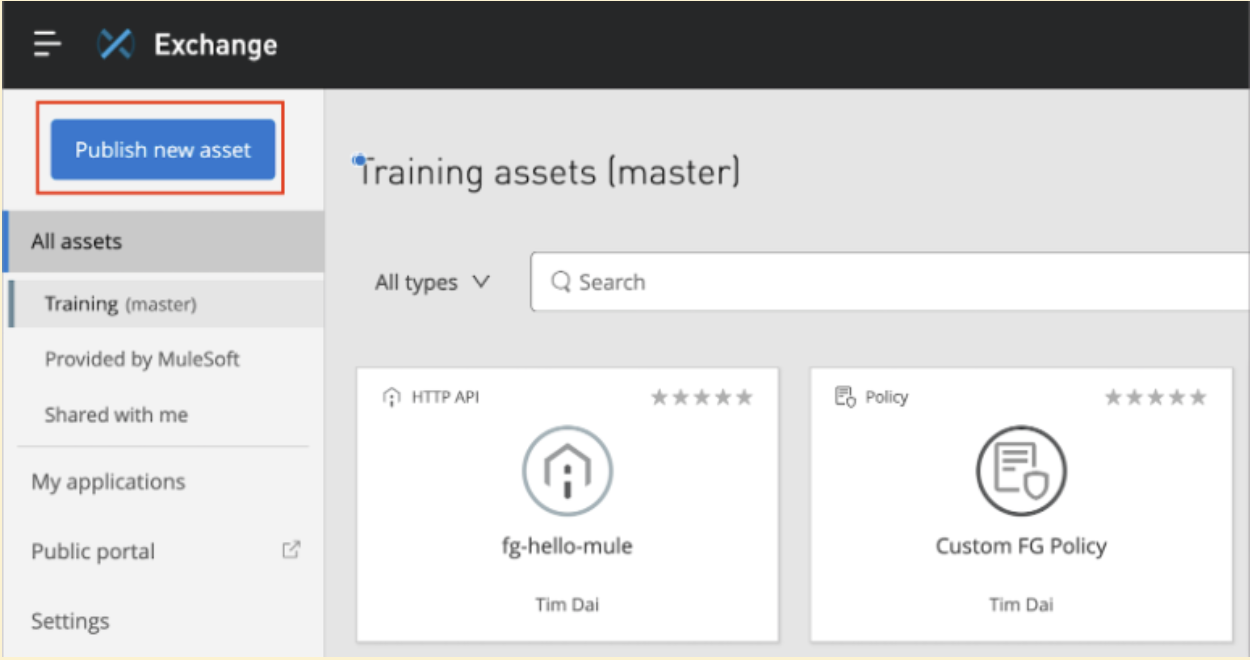
To publish a new custom policy to Exchange and use in connected mode, navigate to Exchange and click Publish new asset button as shown below
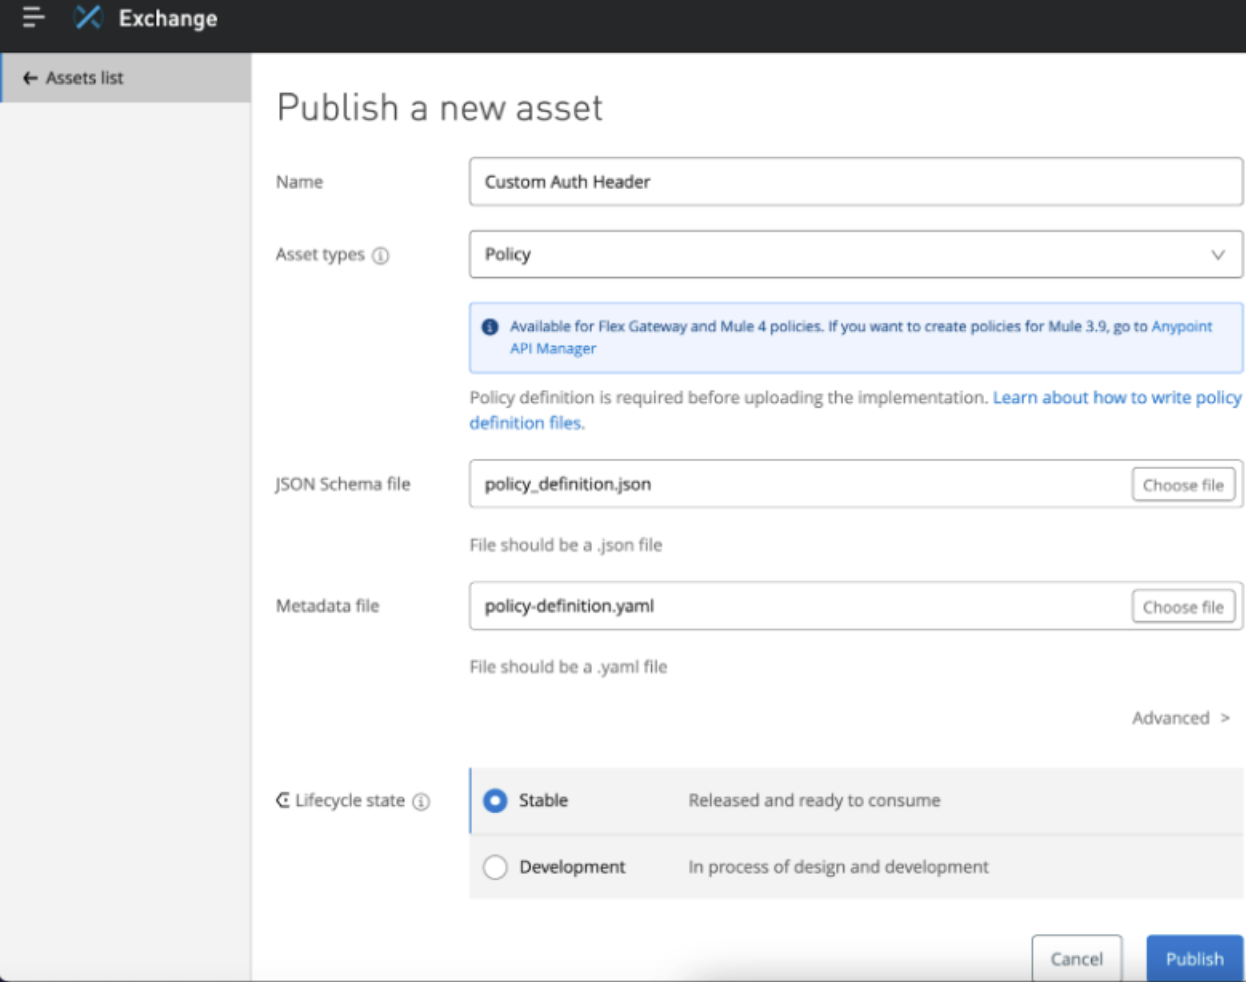
Add policy name, type and select files for JSON schema and Metadata and click publish
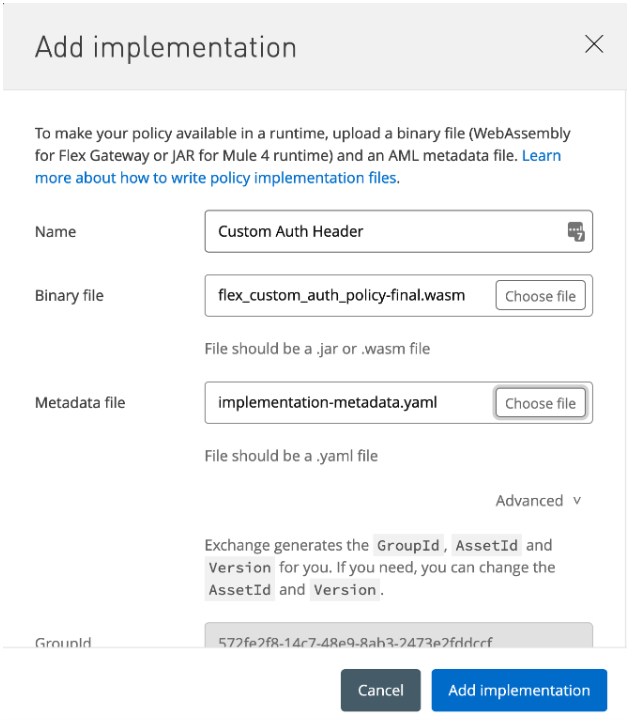
Add implementation Next we need to add our policy implementation file
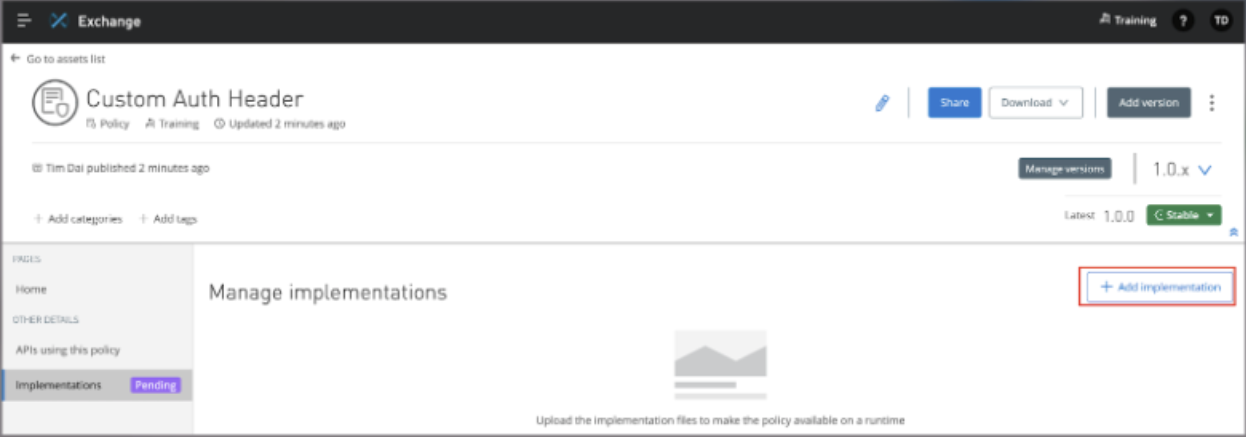
Choose flex_custom_auth_policy-final.wasm file located in ./target directory.
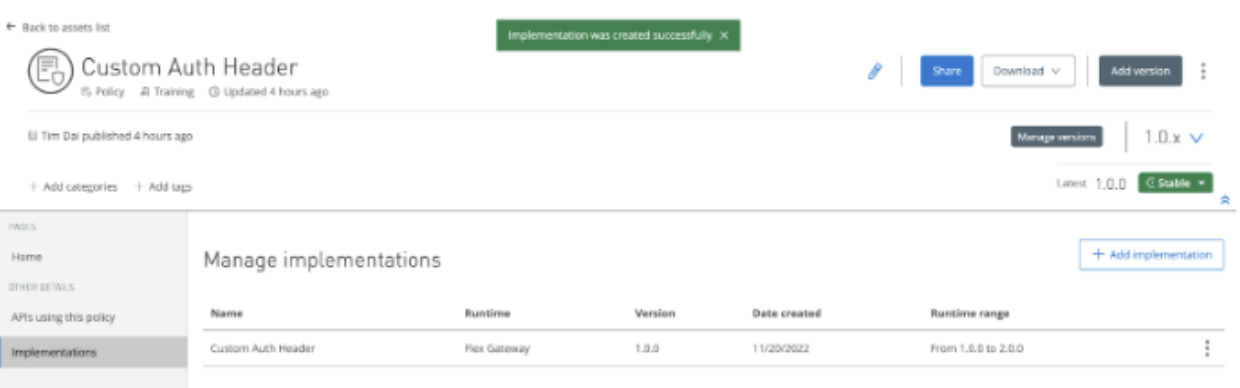
Now our custom policy is ready to use with Flex Gateway
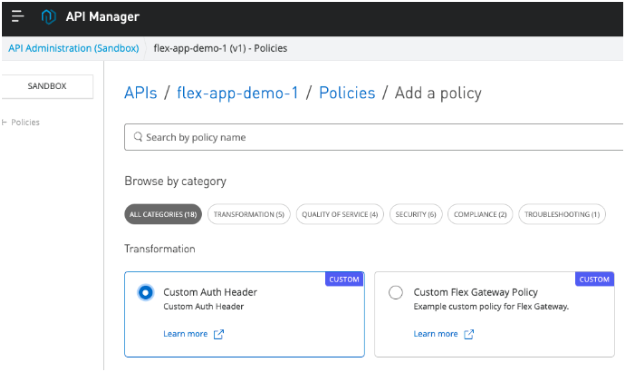
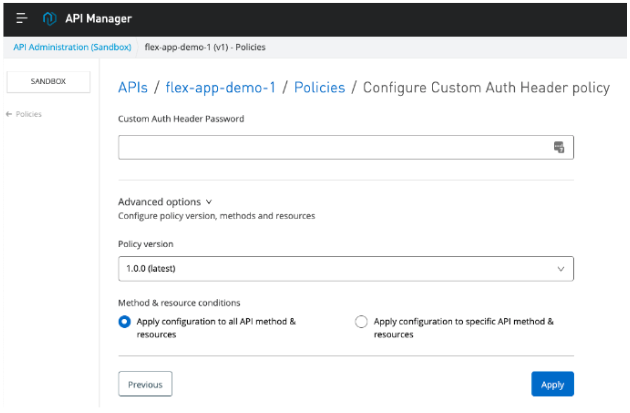
Apply custom policy in API Manager
In API manager we can apply our custom auth header policy to API that is managed by Flex Gateway in Connected mode. This process is same as applying policy to API in Anypoint platform
Conclusion
We have covered many points on building custom policy. This concludes the how-to article of building and applying Custom Policy for Anypoint Flex Gateway. You can find all project code used in this article in the GitHub repository: flex_custom_auth_policy to try it on your own environment.